SEO For Shopify – What You Need to Know.
SEO for Shopify
The world revolves around search and search is getting harder. Every day more sites are coming online hoping to sell their products to the world.
Shopify is a great ecommerce platform and has a lot of search engine optimization features available but they aren’t always clear how and why they should be used. Our experience building Shopify websites in Raleigh has helped us create this guide that will help your ecommerce website sell online. Our guide will walk you step-by-step through the essential SEO features of Shopify. We’re confident if you take these actions on your store, you’ll be well ahead of your competition and closer to unlocking the power that is traffic from Google.
What this Shopify SEO guide is not
We are going to walk you through the process of optimizing your Shopify store. This will work for a new store or an existing store and we’ll have examples of both. We will not cover things like keyword research. There are hundreds of articles out there on the topic and we also want you to focus on what’s good for the user.
So often, when folks are attempting to optimize for SEO they’ll get lost in the idea and end up creating a site full of content that no user would entertain. This is exactly what Google doesn’t want. As you’re reading this guide, put yourself in your target user’s shoes and write things that appeal to them.
How your Shopify theme affects SEO
You don’t need a fancy web design agency with Shopify, you just a need a good quality theme. You may think all themes are created equal and from the surface they can be equally as attractive but once you open the hood you’ll see that can be far from the truth.
We’ve worked with all kinds of themes but picking one from a reliable seller in the Shopify App store, while slightly more expensive, will generally give you a higher quality template with better SEO.
This is not always the case so if you’re in the market for a new theme, feel free to reach out and we’ll evaluate the new theme for free.
How to SEO your Shopify store in 8 Simple Steps
Step 1. Your store’s title and description
Arguably the most important piece of on-site SEO you’ll need to do for your Shopify store is update the title and description under Online Store > Preferences.
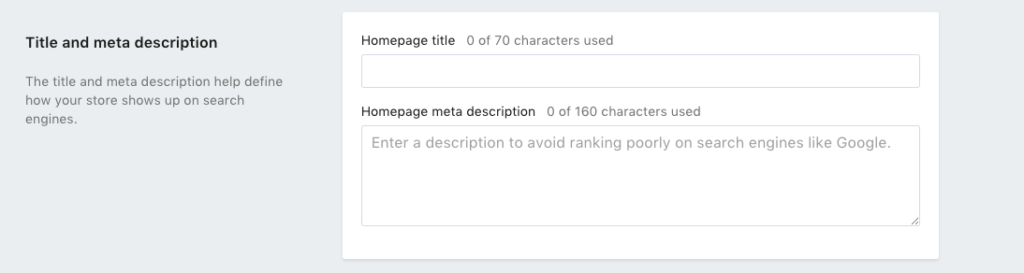
Anything you put in this ‘Homepage Title’ section will be what is included in your tags in the code of your homepage. So when your store is shown in a search on Google, that is what they will see. Here is ours when you search for us.

Since the title is the first thing users will see in the search results we recommend being descriptive but also creative. Standing out from the crowd is Important and here is an example of why:

Which ones of these stands out the most?
Update your title to include a short description of your store and your brand. We like to use the | + Brand Name formula. So for our example store we’d have a title that says: Widget Superstore & Discount Widgets | Brand Name. [Need better example]
In the same vein, the “Homepage meta description” is what will be used in your code to display the sentence underneath your site URL. This used to be used by search engines but its main purpose these days is to let searchers know a little more about your site. Use this opportunity to point out why you’re better and any USPs (unique selling propositions) you may have to help you stand out from the rest.
Step 2. Domains & Third Party Domains
Www vs non-www
This one is a little more technical but it really is a simple change that you’ll want to do for consistency. Google is smart enough to not worry about this for duplicate content issues but in order to maintain a consistent experience you want to make sure your non-www domain redirects to the www version.
What this means is if a user goes to domain.com in their browser, they’ll be redirect to www.domain.com.
In Shopify’s menu, go to the ‘Online Store’ menu and scroll down to ‘Domains’
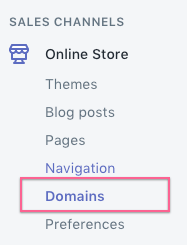
At the top of the page you’ll see the ‘Primary Domain’ which is the URL your customers will see.
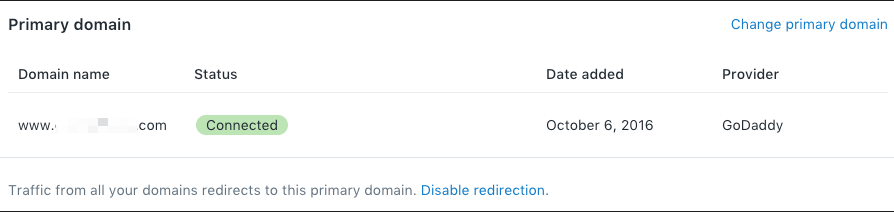
What we want is the ‘Third-party domains’ section. This is the setting that is responsible for redirecting the non-www version to the www version. In this section, fill out the non-www version of your domain. So the box would have, domain.com in it and the proper redirect will be created by Shopify. That’s it, a technical challenge made simple by Shopify.

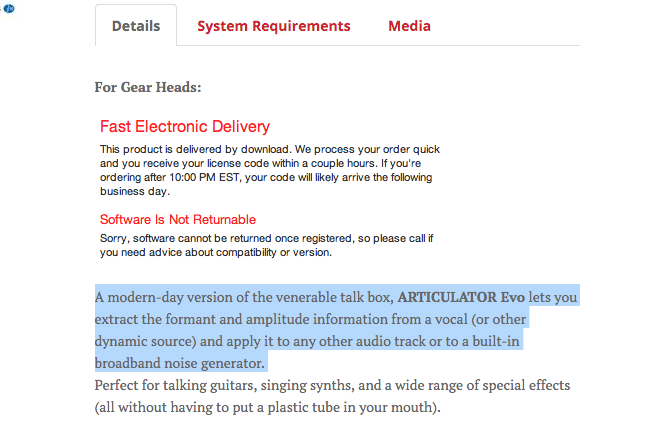
Step 3. Optimizing Images for Search
Something that almost all Shopify stores that approach us have in common is their lack of use of Shopify’s Image Optimization settings. Anytime you add or edit an image you are presented with a box that says ‘image alt text’ like the screenshot below.

What this image alt text does is help search engines better understand the context of the picture so that it knows where to place the picture in its image search results.
When writing this text you want to aim for short and descriptive. One of the most abused, sometimes on purpose and sometimes not, areas of SEO is people dropping their keywords in every image alt tag.
For example:

Good: Jealous dog bites stuffed animal
Bad: Dog Picture Best Dog Toys
Being broad or repeating the image alt tag on all of your images only sends a negative signal to Google that the site is of low quality.
Take a few extra seconds whenever you upload or edit an image and properly create the appropriate alt text.
Step 4. Shopify’s Search Engine Fields
Update your Meta info
We’ve already talked about updating your meta title and description for the home page but this also needs to be applied to products and pages as well and Shopify does a good job providing you easy access to these sections on all pages.
When you click in to edit a page you can scroll down to find a box
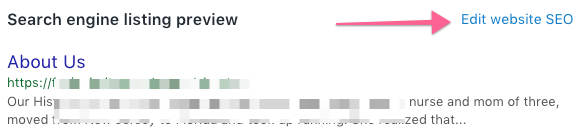
Clicking on ‘Edit website SEO’ will expand the box to show you all of the appropriate fields.
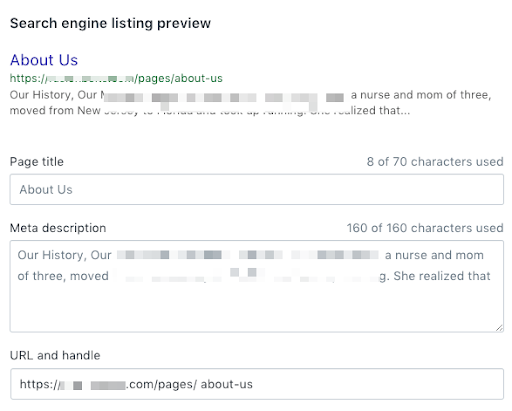
For each page you want to:
- Have a descriptive and unique title.
- Have a Meta description that highlights your USPs and entices the user to click on your page.
- And have a clear URL Handle
Note:
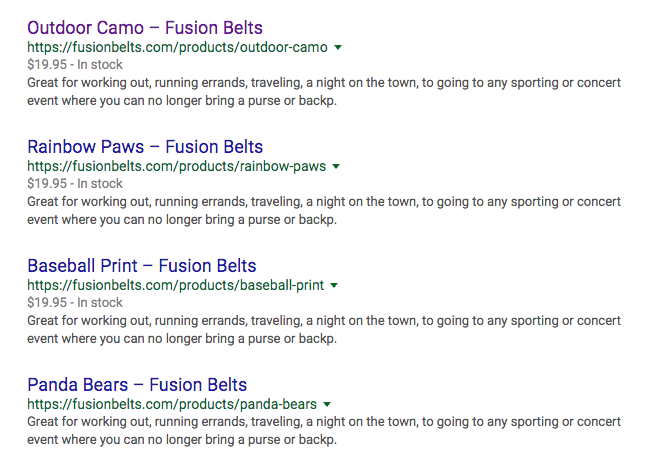
Shopify does add this information by default if you leave the fields blank but the resulting tags are sub-optimal and will not perform well for your store.
In the case for FusionBelts.com you can see unoptimized page titles and a description that is not unique for the products resulting in less clicks from the search results for these products.
Step 4.1 URL and Handle
What Shopify calls the ‘URL and handle’ is what we refer to as the URL and some WordPress sites call ‘permalinks’
In this case for FusionBelts.com
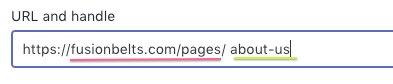
URL = https://fusionbelts.com/pages/
Handle = about-us
In Shopify, we can’t change the URL without changing the domain which we do not want to do so you’ll only look to change the “handle”. This part of the url should be short and descriptive of the page.
If you are selling blue and red fidget spinners, your handle might look like blue-red-fidget-spinners or blue-red-spinners. Short, descriptive and easy to understand. Shopify by default does a pretty good job of these but it is always something to be aware of in case they miss on one.
Note
Limit the number of handles you change if your site has been live for a long time. While Shopify creates the proper redirects for you, it isn’t something you want to have a lot of on your site. Too many changes can lead to users ending up on the wrong page or even broken pages if they come from an link on another site.
Step 5. Product Page SEO
If we were ranking the importance of all of the tips on this page, this would arguably be #1 or 2. This is not a problem that is specific to Shopify sites or Shopify SEO, pick 10 e-commerce shops and we’ll find 6 that have this issue.
This is so often the case because shops will be reselling or drop-shipping a product that is not unique to them. Meaning that other stores will have the same product and same content on their site creating dozens of sites that have the same images and same product descriptions.
How is Google supposed to figure out which one is the best to rank highest? How are users supposed to figure out which one they should buy from?
Here’s an example:
This screenshot was taken from ProAudioBoutique.com
What we did was take the highlighted text and search Google for that exact paragraph.
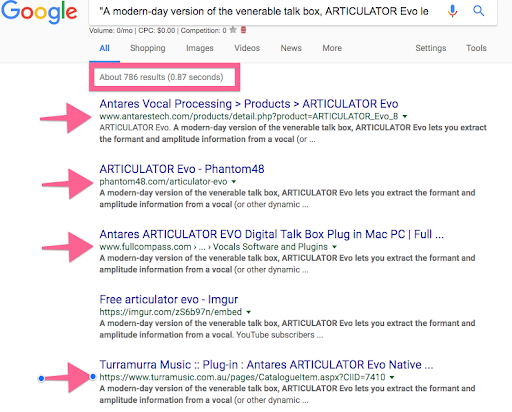
As you can see, there are 786 results for the exact paragraph we highlighted above and 4 of the top 5 domains are ProAudioBouqitue’s competition.
But it is not only drop-shippers who are susceptible to this problem. Many owners of shops that sell original goods have dozens and dozens of product variations and instead of taking the time writing unique and interesting product descriptions and content they’ll use the same text on each page. Creating a low quality site for search engines and products that are uninteresting to users.
I’ll continue picking on FusionBelts, which has over 80 variations of their belt and they all have the same text.
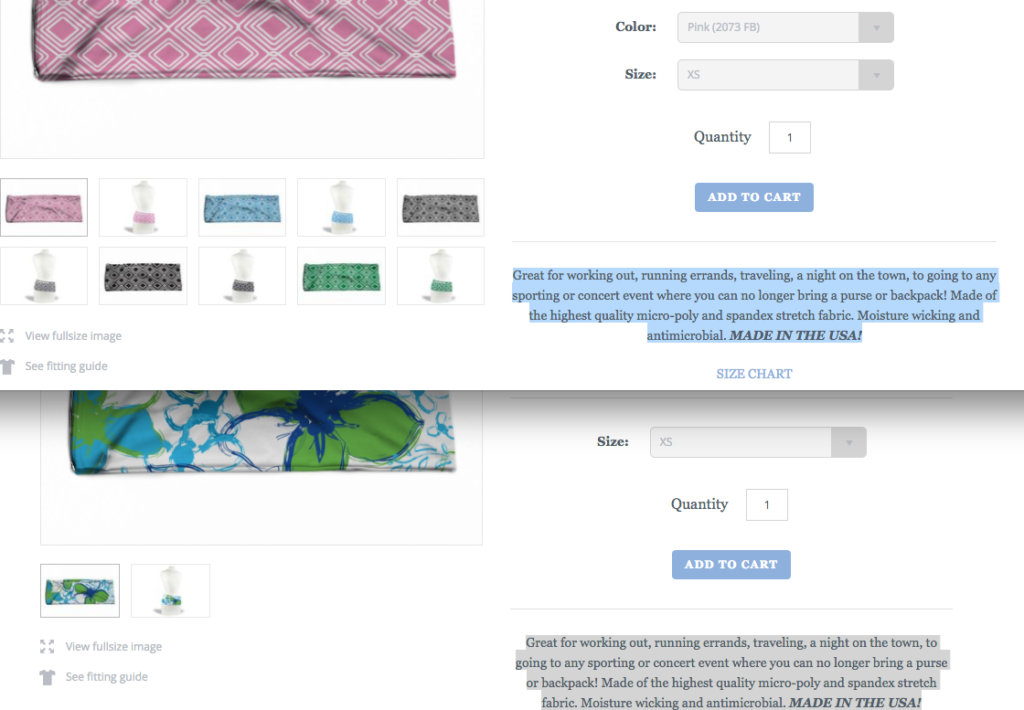
To really stand out in today’s environment, your products need to tell a story. Something original that engages and connects with people so that even if you’re reselling fidget spinners or selling your one-of-a-kind fanny pack, users and search engines will be interested in your pages.
Step 6. Shopify Collection Page Optimization
6.1 This is becoming a common theme and by now you’re probably catching on but on Shopify’s “Collection Pages” which are a group of products, we’ll need to apply the same meta title and description optimization strategy as above.
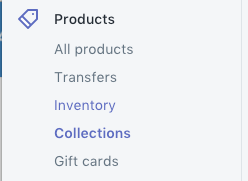
You do this in the same manner you would the Homepage and the product pages we’ve previously mentioned but the collection pages can be found in the submenu of the ‘Products’ section.
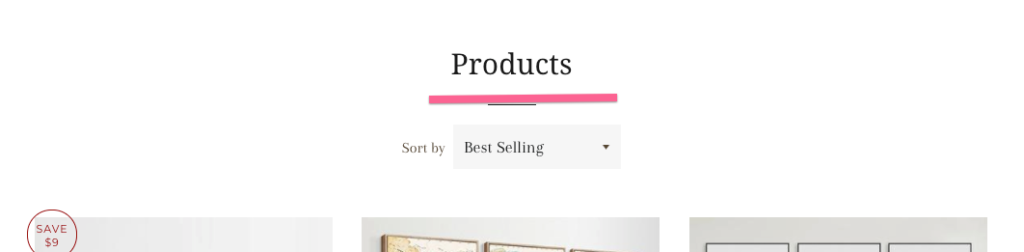
In addition to the meta information optimization, there is one particular optimization that we’d like to make note of; the way Shopify handles the headings on the page is not ideal for SEO. More specifically the ‘Shop All’ collection of most Shopify websites.
This is the section Shopify reserves for loading all products and letting users filter them down but default this collections/all/ page has a generic heading 1 (h1) tag labeled “Products”
Example 1 from IvyandWilde.com
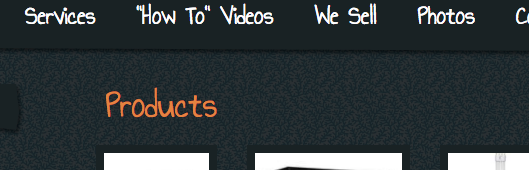
Example 2 from FusionBelts.com

Example 3 from TheFishRoom.net
Now this can be edited in the theme if you’re into coding, html and understand Shopify’s liquid templating format but most of us are not so we’ve come up with a better way around it.
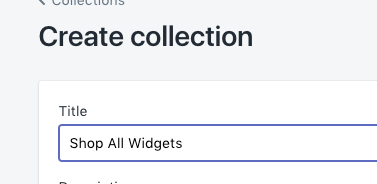
To do this you want to create a collection with all of the products in it.
- Go to ‘Collections’ and click ‘Create Collection’

- Title the collection something relative such as ‘Shop All [Your Product Type]
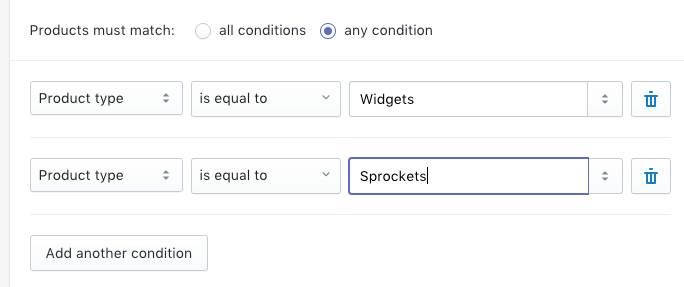
3. Selection ‘Automatically select products by conditions. Choose ‘Product type’ and ‘is equal to’ and then the category of your product.
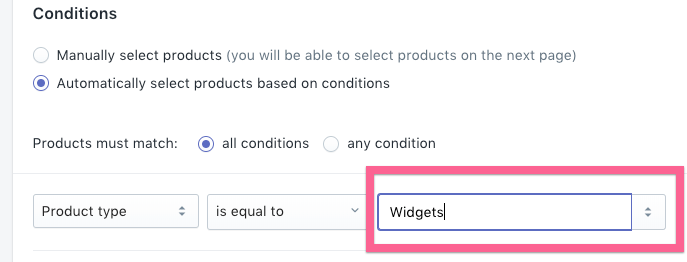
If you have more than one type of product you can select ‘any condition’ and add a series of conditions which will include all of your products
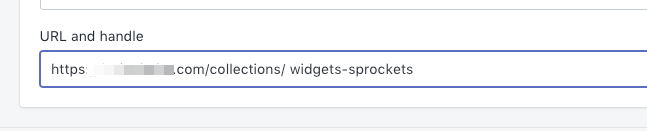
4. Then under ‘Edit SEO settings’ adjust the URL handle to something all-inclusive as we did with ‘widgets-sprockets/
- Anytime you see /collections/all used in Navigation or buttons, replace it with your new All Products URL
1.Shopify Blog
a. Do not put blog posts in images
b. Use the headings in the A menu
c. Edit Website SEO and update titles and descriptions to above specs
d. One Category – don’t add other blogs
e. Don’t use the tags, tag pages will create issues for content quality
f. Keep the blog interesting. Low quality blog posts = low quality sites.
Step 7. Shopify Blog SEO Optimization
One of the biggest misnomers in digital marketing is often around company blogs and the general advice that you should blog as much as possible and that isn’t exactly the entire picture. I’ve seen clients on all platforms who will abuse their blog with generic updates that aren’t helping anyone and all they are doing is diluting the quality of their site.
If you are going to blog on your Shopify site the content needs to be in-depth, useful and engaging. If that is something that your company doesn’t have the resources for either hire an expert (like us!) or just do not engage in blogging and instead focus your time on the other optimization tips in this guide.
After all that you decide you want to blog then there are some must-do adjustments for your Shopify blog as the platform does a lot of things well for ecommerce but it has some real shortcomings in their blog setup.
7.1 Do not post blog posts in images.
This is 2022 and I still see this happening. Clients will get their in-house graphic designer to ‘do a blog post’ and rather than take the time to use the tools Shopify provides, they will use what they know and create a big image with all the text.
Not only is this a bad experience for the readers, especially those on smaller screens but you’re hiding all that juicy content in an image that search engines are still learning to process.
7.2 Use the headings provided in the ‘A’ menu
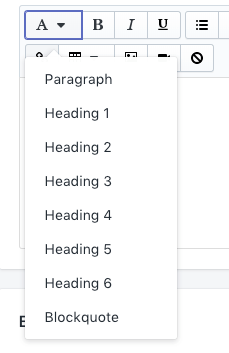
Shopify’s blog post editor (and page editor) do a good job providing you with all of the needed HTML elements to maximize your blog post from an SEO perspective and from a general good user-experience. Use them while writing your blog post in the same manner you would a high-school book report.
General guidelines for the heading tags is to use (1) heading 1 tag per post/page and as many h2-h6s as you need.
7.3 Edit blog post SEO
Rinse and repeat the previously mentioned sections by adding a unique Title, Description and URL Handle.
7.4 Only use one blog
Shopify has an odd way of handling blog categories. Instead of creating categories they ask you to create another blog. You do not want to do this. Please only use one blog and give it a general name. By adding more than one blog you are increasing the level of complication and introducing increased number of unnecessary pages that Shopify creates with each blog.
7.5 Do not use tags
Like most content management systems, Shopify has a tagging system for blog posts that should not be used. Tags create sub-categories but introduce more content issues and increase the dilution of your site’s quality. Just avoid them altogether.
7.6 Keep the blog posts interesting
It bears repeating one more time, Keep the blog posts interesting. Low quality blog posts = low quality sites. Low quality sites = poor SEO.
Step 8. Submitting your site to Google
Now you can wait and Google will likely find your store over time but you can speed up that process but utilizing one of the best tools Google provides, Google Webmaster tools.
Step 1. Create a Google Webmaster Tools account
Step 2. Verify your site to establish ownership in GWT.
Google gives you a variety of options to do this. If you’re unsure of them or need some help, please leave a comment down below and we’ll help you.
Step 3. Login to GWT and submit your sitemap for Google to crawl and monitor. Your sitemap is located at yourdomain.com/sitemap.xml
You can go directly to the sitemap submission form with this link https://www.google.com/webmasters/tools/sitemap-list and then clicking the big red ‘add/submit sitemap’ button
Notes
We left out the typical SEO advice you’ll see from a lot of places because we don’t want you to spend your time worrying about specific keywords which is the cause of so many sites to over-optimize and spam their site and have the opposite effect on their SEO.
Focus on creating the best and most descriptive site for the users and that will go a long way towards increasing your Shopify sites SEO.
If you’ve done all of the above and still want more from your site, reach out to a Shopify SEO Expert and get a specific plan of action to grow your site’s search engine optimization.